
Water marble nails area unit a nail art technique implicating dropping nail lacquers into crystal clear water and generating a pattern on the water surface, the pattern formed is then deported to the nails. This edible fat technique in nail art is completed by adding enamel into a bowl of water and slightly squirming the colors around in order that after you drench your fingers in it, you finish up with a really classy-looking marble result on your nails! It’s a lot easier than it sounds. Here we've got superb marble nail art styles and ideas. Check them out below.

2. Groovy Marbled Nail Art

One issue common to any or all those marbleized nail arts is to dip nails into the water. But, this groovy kind of marbleized nail art is marginally completely different. In such a sort, art is 1st created and so dried and later dig sizes to form them match on one’s nails. One will employ it too. Begin by adding the 3 nail varnish colors into the bowl of water during a means that they type concentric circles. Use a strip afterward to form lines within a similar pattern within out. Leave it for a few times permitting it to fully dry and place it on a towel afterward. Now, you'll be able to cut them up into items in order that they match on your nail. you'll be able to repository them during a cool, dry place and use them whenever you wish them once more. To use them, you'll provide a white coat as a base and apply a safeguarding layer round the nails so as to avoid any filth or mess, or to form it easier, you'll be able to simply clean it up with nail varnish remover shortly. On wet polish applied, place your cut out styles on the nail. try this for all the nails and finish off the perimeters that emerge. Finally, apply a layer of last coat, and you’re finished this groovy marbleized art.
4. Tiramisu Marble Nail Art

If you're having an appetite and desserts deck you up, you actually ought to be selecting this as your marble nail art style. The fantastically swooshed reminder browns, beige and off-white connect you with delicious afters, no? allow you to be warned, after this, you will find yourself adding few additional calories to your day, otherwise, you will develop a dead desire to eat Tiramisu! to start out with, paint your nails beige as a base. Shawl your nails with tape beneath the nail as a nail guard against mess. Trickle all told the nail polishes during a homocentric circle as shown on top of. Use a pick to draw a pattern of wrong-side-out lines, four lines inwards and outward. Once you're finished the planning formation, dip your fingers deep within the bowl. the planning ought to currently be imprinted on your nails. Use a cotton swab lordotic in nail enamel remover to wash the extras. certify you opt for the highest coat in conclusion.
6. How About Marshmallow?

White and Pink may be an excellent combination that reminds one of the marshmallows. This candy marbleized nail art offers you a serene feeling inside a fraction of seconds. Tally in few droplets of white and light-weight pink nail enamel into the bowl of water. you'll be able to use a needle to pull it around. Cape tape around your fingers beneath your nails so you don’t get unessential nail enamel marks on your skin. Then, dip your finger into the bowl of water one by one. you'll be able to do all nails or alternate nails, whole your decision. Clean it up with a cotton sponge swayback in nail enamel remover. provide the ultimate touches with a high coat.
8. Alright, Spring Look it is!

A blend of purples, blues and pinks area unit certain this spring. what's your say during this super cute combination? begin with a white base, giving it a delicate look. in an exceeding bowl of water, add some drops of the nail paint in swaying coaxial circles. Clout the colors gently with a pick. One by one, dip your fingers, into the bowl of water. take away the additional edges and fix the ultimate coat and you're equipped to shine.
9. Some Retro Looks Classy too.

This is one thing returning straight out from the Nineteen Seventies era, that was the time for autumnal shades. Variants like mauve, beige and avocado inexperienced were vogue then. you'll be able to fuck simply by applying a white base and mixing different colors.
10. Ocean Blue Sorbet Stands In!

A shrub of white and stirs of blue- sounds excellent for a saucy summer! White and blue strokes area unit simply awing for giving your nails a profound look. For such enticing colors, one will invariably keep the white color as a nail base. However, there has to be some predefined safety sense whereas acting water marble nail art like one will invariably try to defend the skin around the nails with tape or jelly so it doesn't irritate your skin later and maybe cleaned effortlessly. Also, certify to solely gently swirl the colors within the bowl of water to relinquish it less of a man-made result. invariably attempt employing a larger bowl for an additional extent is usually higher as a result of you'll dip all of your nails indirectly and don’t have to be compelled to refill time and once more.
7. Periwinkle is here!

It’s monsoons here, therefore periwinkle is often the simplest type of marble nail art that your fingers will carry. you'll build it by adding in drops of all the colors excluding the blue one since blue goes to be the last color the center of your every nail. Swirl all colors during a haphazard manner by employing a strip. Dip your nails once this mixing. Clean and dry the additional edges mistreatment cloth or swab drenched cosmetic remover. Lately, fix them with the highest coat.
5. Let’s turn Turquoise

Turquoise stones ar one amongst the traditional stones in human history. It’s an awfully common rock amidst shamans and talismans. it's been used for safeguarding, peace, calmness, and healing. Also, it's terribly mind-blowing. therefore what does one suppose turquoise stone evoked water marble nail art? Kickstart by painting all of your nails in the shade of turquoise blue. in a very water bowl, scatter a number of drops of black cosmetics. Move the bowl around in order that the cosmetics disperse proportionately. Then, splash some lotion into the bowl. It ought to be adequately shattered and separated as shown within the higher than image. Then, dip your nails one at a time into the bowl. wash any cosmetics marks that may have created its manner onto your skin with some cosmetics remover and a cotton swab. enable your turquoise nail art with a final high coat, and you’re all set!
3. Beneath the Blue

If the flick the insufficient imaginary creature ever fascinated you, let American state tell you the higher than nail art is one among the explanations in order that it will connect you to the design shown within the film. It offers a really loveable look and might be done among minutes. initial of all, paint your nails with the darkest shade of turquoise, for a good looking base. Then, blanket some tape around your fingers, underneath your nails in order that it doesn’t get too untidy after you dip it within the bowl. Apply the colors into the bowl of water and make compassionate snakes. Now, dip your nails flip by flip within the bowl of water. take away the tape gently. close up any lingering cosmetic with a cotton scrub unfit in cosmetic remover. Lastly, fix it with a primer coat and you're smart too!
1. Neon Marbled Nail Art
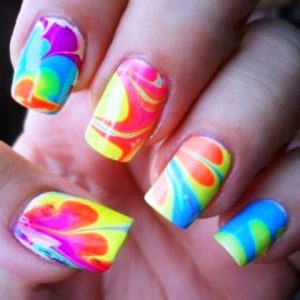
This Ne marble art can build your nails look contemporary, funky and fetish. Also, it's terribly straightforward to try to to with them too. in a very bowl of water, begin by adding many drops of the nail varnish you would like to use. Then keep reckoning the various variants of nail colors in a very circular kind aspect by aspect. when that’s done, use the pick to whirlpool around the colors. Wriggle them around until the time, the planning causes you to glad enough. Once done, you ought to dip your fingers into the color theme created, one by one. produce an identical pattern in a very similar approach yet again within the water, if it’s not enough for the nails. Use a cotton sponge covered nail varnish remover to clear up the realm around the nails. Finally, seal it with a primer coat, and you’re finished those trendy nails.
0 Comments